Tampilkan postingan dengan label WINDOWS XP HACKS. Tampilkan semua postingan

Selasa, 07 Juni 2011

How To Change Start Button Text In Windows Xp


How to change start button text in windows xp

Hey geeks here is a way to change the text in windows xp “start” button. Though vista and windows seven has widely reached market. Xp happens to be the os running in many of the commercial systems. Here is a cool tip to add some more fun in your xp.
I used a tool called “Resource hacker” for the implementation of this trick. Resource hacker is available for free in Geekyard.
Now before we start, I suggest all the geeks to take a back up of your explorer.exe(c:\windows)
Steps :
Run the Resource hacker, and file->open . . browse for explorer.exe in c:\windows and open it
• Now, on the left pane, u will have several category (Bitmap, icon, menu . . .) in that select String table
Expand it by clicking the plus sign then navigate down to and expand string 37 followed by highlighting 1033.
• If you are using the Classic Layout rather than the XP Layout, use number 38
• The right hand pane will display the stringtable. In that stringtable we’re going to modify item 578,currently showing the word “start” just as it displays on the current Start button.[
• Just change with the required text inside the quote instead of “start”.
• Now hit compile script at the top.
• Now save the file” anyname”.exe (u can give any name followed by “.exe”) and save the file in “c:\windows”
• (note. . use “saveas” )
resource hacker, changing text in start button
Now to deal with registry. . .
• Goto : Run->regedit ;
Navigate to this key :
HKEY_LOCAL_MACHINE\SOFTWARE\Microsoft\Windows NT\Current Version\Winlogon
• Once you’re there double click the shell entry to open the Edit String Dialog box.
• In Valuedata, enter the name that was used to save the modified explorer.exe file( i.e. in our case is geek.exe) click ok.
how to edit registry, registry hacking
Restart the system for the changes to be effective.
If all went as planned you should see that start button with the new modified text .
how to change text in start button
That’s it geeks. . enjoi . .
Read more »

Kamis, 02 Juni 2011

XP Installation Guide


Basic Step If Your are installing Windows Xp ,after got Corrupted by some mean,they It is important to Backup your Personal Data in a Other Storage device like Cd's, DVD's to avoid loosing Your Data. If You are not in position of Storing the Data then No need to worry. What you have to do is ,just copy the important Data from your C: Drive ,if any,to other partition of Your hard disk because only C drive will get effected if you reinstall operating System.

Please If you are new to this then follow each step slowly by reading the instruction there and here.
Prepare The Boot Sequence
Insert the windows XP cd in your cdrom and than go to the BIOS by hitting “DEL” or “F12″ when your system in powering on. Go to Boot order and make sure cdrom is on the first place.
Save settings and restart your computer.


 1/ Boot up your pc. During the initial boot cycle insert the Windows XP CD into your CD-ROM


2/ You will see on your screen 'Press any key to boot from CD'
3/ At this stage press either Enter or any other key
4/ Set up will now automatically inspect your computer's hardware configuration
5/ After set up has checked your hardware a blue screen will appear with the words 'Windows set up' in the top left hand corner.


6/ At this stage, should you have a RAID, SCSI or SATA drive, you will have the option of pressing F6 to install the third party drivers for this hardware. If you do not have any of this hardware installed on your pc there is no need to press F6.  XP will now start loading files into memory.
7/ After all the files have been loaded into memory the Welcome To Set Up Window appears.


8/ To begin installing XP Press Enter
9/ The next screen to appear is the EULA (End user Licence Agreement) Press F8 to accept the licence or ESC if you don't want to accept the licence agreement and want to terminate the install.


10/ After agreeing to the licence agreement set up searches your hard drive for any partitions
11/ The next screen shows all the partitions on your hard drive. You may have just one or several depending upon whether you have created partitions prior to installing Windows XP.


12/ You can select the partition you want to install XP on.  Once you have selected the partition press Enter
13/ The next window will offer to format the partition for you. If the partition is already formatted the option will be 'leave file format as it is.' If it hasn't been previously formatted then you will have the option to either:


  • Format the partition using the NTFS file system (Quick)
  • Format the partition using the FAT file system (Quick)
  •  Format the partition using the NTFS file system
  •  Format the partition using the FAT files system
14/ It is recommended that you use the NTFS file system so select 'Format the partition using the NTFS file system'.
15/ Set up will now begin to format your hard drive.


 16/ Once the drive has been formatted windows set up will start copying files to memory.
 17/ Once the copying has been completed windows initialises your configuration and then proceeds to reboot your machine.


18/ Your system will now reboot.
19/ On reboot you will again be presented with 'Press any key to boot from CD' On this occasion DO NOT press any key. Leave well alone. Windows will then automatically launch. If you press any key during this process you will start the set up procedure all over again.


20/ You will now see the Windows XP Graphical interface as windows loads
Note If your copy of XP does not include Service Pack 2 the Logo will look slightly different to the one illustrated below in as much as it will display Windows XP Home or Professional. As soon as you upgrade to Service Pack 2  (SP2) the Home/Professional branding will be removed.
21/ At the next screen Windows will begin copying files to your hard drive.
 22/ As the files are installed on your hard drive you will be asked to select various options. The first to launch is the Regional and Language Options window.


23/ Click the Customise button to select your Country standards, language, etc. Click OK when you are satisfied with your selections.
24/ After you have completed that return to the original Regional and language Options window and click the Details button.


25/ From here you can set the default keyboard language. Click OK when finished.
26/ Now click the Next button.
27/ The next window asks for your name and company. Fill this in with the relevant details.


28/ After completing the name and company dialogue boxes press Next.
29/ Now you are presented with the Product code number screen.


30/ Insert your product code numbers in the relevant boxes. Take your time here, as inserting the wrong number, will cause an error.
31/ After inserting the product code number press Next.
32/ Your next screen is the Computer and Administrator password screen.


33/ XP usually inserts a computer name but you can change it if you want something different.
34/ Next insert the Administrator password (you don't need to do this for XP Home Edition) and then confirm the password in the next dialogue box.
35/ Click Next to continue.
36/ If you have a Dial Up Modem installed you will now be asked for the Country and area code information. Fill this in as necessary and press Next. Do Not worry if the Dial Up Modem screen doesn't appear during set-up. Personally I much prefer to set-up the Internet Connection after Windows XP has completed it's installation.
37/ The Date and Time Setting windows now appears.


38/ Select your Time Zone from the drop down time zone list and XP will make the other adjustments.
39/ Finally click the Next button.
40/ Windows now starts to install the Networking part of the operating system.


41/ Assuming you have a Networking Card installed the Networking Settings window will now pop up.
42/ The Typical Settings Option should already be selected so simply press the Next button.


 43/ Unless you are on a Network or Domain you simply need to press the Next button If you are on a Network then click the Yes make this computer a member of the following domain and then click the Next  button. You may need to ask your administrator for these details.


44/ Windows will now continue copying files.
45/ After a while Windows will finalise the installation. The progress bar will show Completing Installation followed by Installing Start menu icons, registering Components, Saving Settings and, finally, Removing any temporary files used.
46/ After finalisation Windows will again restart your pc.
47/ On reboot you will again be presented with 'Press any key to boot from CD' On this occasion DO NOT press any key. Leave well alone. Windows will then automatically launch. If you press any key during this process you will start the set up procedure all over again.
48/ You will now see the Windows Logo screen.
 49/ Once Windows has loaded it will adjust your monitors resolution. Just click OK to continue.


50/ If you are happy with the resolution change press OK again.
51/ Windows now needs to apply the computer settings so you need to be a little patience here.
52/ The Welcome to Microsoft Windows screen now appears. By clicking the ‘?’ you can get help.


53/ Click the Next  button to continue.
54/ If you are using a copy of Windows XP with Service Pack 2 already integrated the next screen will ask you to enable the Windows Firewall.
 55/ The next screen asks you to Activate your copy of Windows XP. You have 30 days in which to activate your copy of Windows so I always select the No option and then activate when I am satisfied everything is working correctly.
 56/ After the Activation screen Windows XP asks you How you will connect to the Internet.  This and the following screen may only appear if you are using a DSL or Cable modem. Although personally I prefer to set-up the Internet Connection after Windows XP has finally been installed.
 57/ After making your connection selection Windows check for Internet Connectivity.
 58/ You are now asked Who will use this computer.


59/ Insert the Name(s) of the user(s) who will be using the computer and then press Next. 
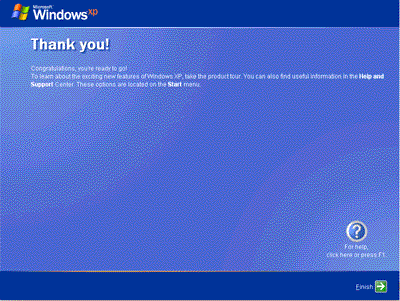
60/ After completing the ‘who will use this computer’ section a thank you screen will appear.
 61/ After a while the Welcome Screen will appear.
 62/ Finally the Windows XP desktop will appear in all its glory.
63/ Congratulations! You have now successfully installed Windows XP
Read more »

How to install an additional hard drive using Windows XP/2000 Disk Management.


Installing a second hard drive in Windows XP is not as easy as it should be. If you're accustomed to plug-n-play devices, it just seems logical that XP would detect the drive and take the steps to install it. But it doesn't. You have to manually install the hard drive in XP.

1. Install Secondary drive.

   2. Boot into Windows XP/2000.
   3. Open Computer Management and select Disk Management.
   4. Initialize the drive.
   5. Partition the drive.
   6. Format. the drive.
   7. Assign the drive letter.
   8. Initiate changes.

Opening Disk Management in XP/2000
  1. Right click on My Computer.
  2. Choose Manage (This will open the Computer Management window).
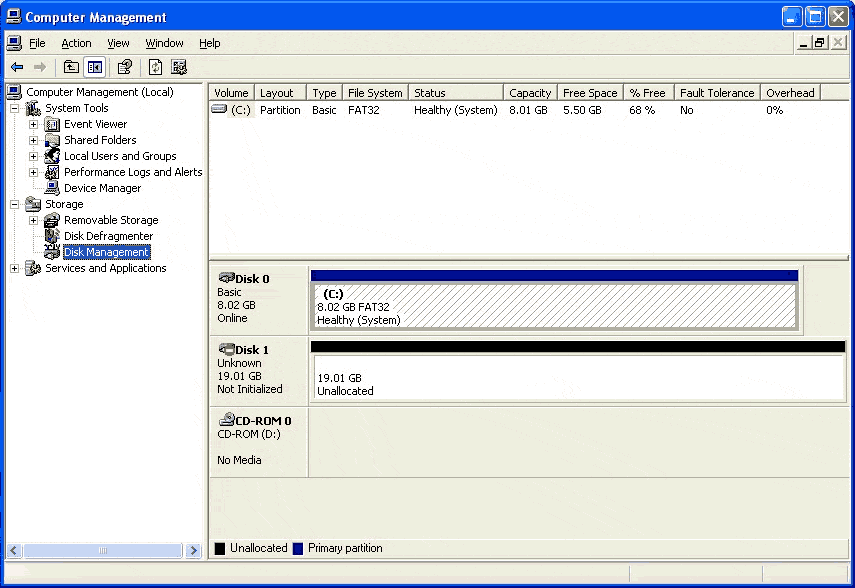
  3. Choose Disk Management under the Storage category (Refer to Figure 1).
Figure 1 (Click on the image to view a larger image)


When the drive is first seen by Disk Management it will not be seen in Windows Explorer. For the drive to been seen in Windows Explorer the drive will need to be configured through Disk Management. XP/2000 will normally see the unpartitioned drive when you open Disk Management and start the wizard for you.

Note the Unallocated Drive in Figure 2. 
At this point XP/2000 will normally launch a wizard to walk you through setting up the drive, but it may be necessary to set it up manually.

Figure 2 (Click on the image to view a larger image)


 The Partition/Conversion Wizard Method
  1. Select the drive to partition (the new drive).
  2. Select the drive to Convert (not needed for new drives).
  3. A summary screen will tell what the wizard will do if you click on Finish. Confirm that the correct drive is selected.
  4. Once you click on Finish, the drive will be initialized and you will be taken to the Partition Wizard. See Figure 3 for details.
Figure 3 (Click on the image to view a larger image)


Manually Initialize
If the XP/2000 Initialize and Convert Hard Disk Wizard did not automatically open when you opened Disk Management, you will need to perform the following steps to initialize the hard disk drive.

   1. Right-click the new drive to initialize it (Refer to Figure 4). This prepares the drive to be used with Windows.
   2. Once you choose initialize, another window will come up asking you to confirm which drive to initialize. Once a drive is initialized the data on the drive will be erased.

      Figure 4 (Click on the image to view a larger image)


  1. Choose the correct drive. Windows will usually only display uninitialized drives, but if you have a dual boot system, drives from other operating systems will show up in this list.
  2. Once you choose OK, the drive will be initialized for use with Windows XP/2000 (it still will not be seen by Windows Explorer).
 Figure 5 (Click on the image to view a larger image)


New Partition Wizard
Once a drive is initialized for use with XP/2000, you may format and partition the drive. This option is not available for drives that do not have free space or for drives that have not been initialized.
  1. Right-click on the unallocated space, and select New Partition (Refer to Figure 6).

    Figure 6 (Click on the image to view a larger image) 
  • Partition type: Primary – This is the normal selection for drives with less than 4 partitions.
    Extended – This is used if the drive is split in to 4 or more partitions.
    The default selection is Primary. Click on Next.
  • Specify partition size in Megabytes - Set the size of the partition (the full drive capacity is the default). If you are creating a single partition, leave the default amount. If you are creating multiple partitions, enter the size in megabytes for your first partition. Click on Next.
  • Assign the drive letter - This allows you to select the drive letter for this partition. The setup will default to the next available drive letter. You may also assign the drive to another letter that isn't in use if you like. Click on Next.
  • Format Partition - The New Partition Wizard will by default be set to format the drive with an NTFS file system, a default unit allocation size, and a volume label of "New Volume". For a faster format, check the Perform a quick format option. Keep in mind that if you choose this option, the format will skip several verification processes. It is recommended that you leave the Enable file and folder compression option unchecked. Click on Next.
  • Summary – Allows you one more chance before committing to the changes. If you do not wish to make any changes, click on Finish. (Refer to figures 7 and 8.)

Figure 7 (Click on the image to view a larger image)


Figure 8 (Click on the image to view a larger image)


Finished
Once you have clicked on the Finish button, the New Partition Wizard will close. In a few seconds, the "Unallocated" partition will say "Formatting". When the drive has completed formatting it will display as a healthy drive with the size and type of partition below the volume name and drive letter.

Figure 9 (Click on the image to view a larger image)

Read more »

VISITORS

Flag Counter